





Last updated: November 16, 2026
Quick Answer: In most cases, the right choice is 2 steps — selective extraction first, then timber remediation for the wood that is still sound. If the timber is structurally failed, contaminated, or beyond repair, remove it; if it still has enough strength to hold a fastener, take a preservative, or carry a load, keep and treat it with care and, where needed, consult a qualified professional.
This guide, Extraction Methods and Timber Remediation: The Complete Guide, is written for the person staring at stained, soft, split, or insect-marked timber and needing a practical call, not theory. For wood science references, the USDA Forest Products Laboratory’s Wood Handbook and the EPA’s renovation rules are the two sources I would anchor on first, and it is wise to consult a qualified professional when the damage may be structural or hazardous.
Key takeaways
- Extraction means removing damaged wood so the remaining structure is safe enough to keep.
- Remediation means stopping the cause, drying the timber, and treating or repairing what is still sound, ideally with professional input when the damage is serious.
- The best method depends on the problem: rot, insects, water, fire, or surface contamination do not call for the same fix.
- If wood has deep structural loss, repeating patches only hides a failure.
- When work involves lead paint, follow EPA Renovation, Repair and Painting rules in 40 CFR Part 745 and use a certified contractor if required.
- The USDA Wood Handbook is a useful reference for decay and repair, and a qualified professional can help interpret what is surface damage versus structural loss.
What does timber extraction actually mean?
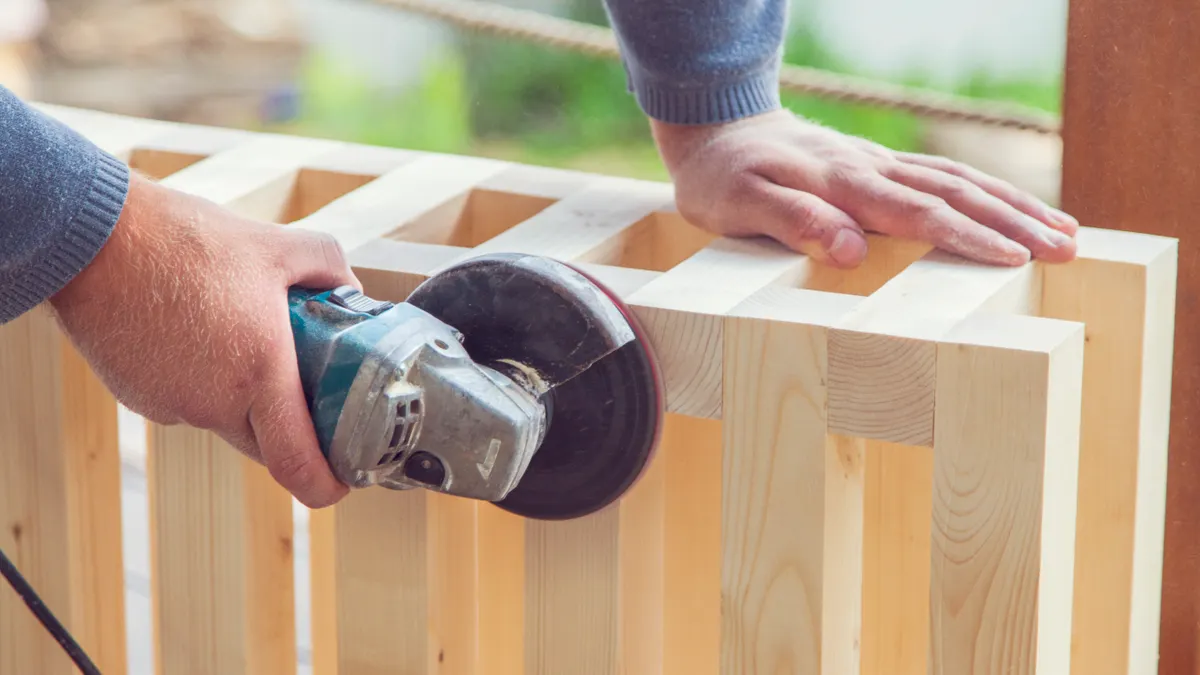
Timber extraction means removing damaged, unsafe, or contaminated wood from a structure so the remaining timber can be repaired or replaced. In practice, that can mean cutting out a soft section of a joist, removing a rotten sill plate, stripping a failed surface layer, or taking out timber that is no longer dependable.
The key idea is not “take wood out because it looks bad.” It is “take out the portion that has lost its job.” A board with surface staining may only need cleaning and drying, while a beam with deep decay, checking, or insect galleries may need partial or full removal.
Extraction is often used in three situations. First, there is visible decay from long-term moisture. Second, pests such as termites or carpenter ants have left weakened wood behind. Third, the timber has a coating or contamination that must be removed before repair, such as failed paint layers, soot, or surface grime that blocks adhesion.
A generic article often gets this wrong by treating every damaged board the same, so it is worth consulting a qualified professional when the depth of damage is unclear. That can create two bad outcomes: too much removal, which costs more and weakens the assembly, or too little removal, which leaves a hidden failure in place. The USDA Wood Handbook is useful here because it separates surface damage from structural loss instead of treating them as the same problem, and a professional assessment can help confirm which is which.
For reference, the USDA Forest Products Laboratory’s Wood Handbook explains wood properties, decay, and repair principles: https://www.fpl.fs.usda.gov/documnts/fplgtr/fpl_gtr190.pdf
Which extraction method fits the damage?
The best extraction method depends on what is wrong with the timber, because rot, insect damage, and contamination fail in different ways. A clean cut works for structural loss; abrasive removal works for coatings; chemical stripping is only for specific surface problems and needs care. In practice, the right method also depends on whether a qualified professional recommends preserving part of the member.
Manual cutting and section removal
Manual cutting is the most direct method when a specific section is unsound. A carpenter cuts back to solid wood, then installs a splice, dutchman, sister, or replacement piece. This wins when the damage is localized and the surrounding timber still carries load.
Its strength is control. A saw, chisel, or multi-tool can stop exactly where the sound wood begins. Its weakness is that it exposes the true extent of the damage, which may be larger than the stain suggests. If the decay has spread behind the visible edge, a small patch can fail again.
This method suits framing members, joists, and trim with localized rot or mechanical damage. It is not the best choice when wood is powdery through a long run, when insect tunnels are widespread, or when the piece is so compromised that the cut leaves too little bearing.
Mechanical removal and surface planing
Mechanical removal uses sanding, scraping, planing, or routing to strip away damaged surface layers. It is useful when the problem is shallow: weathered fibers, loose paint, char on the surface, or a thin soft layer that has not reached the core.
This works best for finish wood and exposed timber where the goal is to restore a clean bonding surface. It loses when the damage is deep. A router can make timber look better while leaving the real failure untouched. That is the trap: a neat surface does not mean sound wood.
A practical rule is simple. If the timber still feels firm after the damaged layer is removed, surface extraction may be enough. If a probe sinks easily or the wood crumbles, surface work is not enough.
Abrasive blasting and specialty cleaning
Abrasive blasting or specialty cleaning is used when the timber needs heavy surface cleaning, such as char, grime, or failed coating removal. The method can be effective, but it is the most likely to over-remove soft earlywood and leave a rough profile that needs more finishing.
This method is better for large exposed members than for delicate trim. It can also create dust control and containment problems, especially if the surface may contain hazardous coating. If lead paint is involved, EPA Renovation, Repair and Painting rules apply in 40 CFR Part 745, and the work must follow containment and cleanup rules.
The EPA rule text is here: https://www.ecfr.gov/current/title-40/chapter-I/subchapter-R/part-745
Chemical stripping and solvent cleaning
Chemical stripping removes coatings, adhesives, or surface contamination that scraping cannot handle cleanly. It is a finish-removal tool, not a cure for structural failure. It can be useful before adhesion repair or repainting, especially where profiles are intricate and hand scraping would damage detail.
Its downside is obvious: it adds cleanup, disposal, and product compatibility concerns. Some removers swell wood, leave residue, or interfere with coatings. If the timber is already moisture-sensitive, the wrong chemical makes later remediation harder, not easier.
Thermal removal and controlled drying
Heat tools and controlled drying support extraction when moisture is the real enemy. The goal is not to cook the wood; it is to drive off excess moisture and make further repair possible. In damp timber, drying comes before repair, or the fix traps the same problem inside the wood.
Heat has limits. It can crack resinous wood, distort thin sections, or make an already brittle area worse. Use it as part of a moisture-control plan, not as a shortcut.
Can rotten timber be remediated?

Yes, rotten timber can be remediated if the decay is shallow enough and the moisture source is fixed first. Remediation without source control is wasted effort, because rot returns as soon as the wood stays wet again.
Timber remediation means restoring the wood’s function after the cause of damage has been addressed. That can include drying, treating with preservative, consolidating weak fibers, patching, sealing, improving ventilation, or replacing only the failed section. The question is not “Can this wood be made prettier?” The question is “Can this wood still perform safely after treatment?” A qualified professional can help answer that when the section is load-bearing or the decay is hard to judge.
A common mistake is to apply filler before the decay has stopped. That locks in wet wood and hides a continuing problem. Another mistake is to assume every softened area needs full replacement. If the member still has enough sound material, a partial repair may preserve historic fabric, save time, and keep the structure intact.
Remediation is strongest when the damage is moderate, localized, and the cause is known. It is weak when the timber has broad internal decay, active insect attack, or crushing near a support point. In those cases, replacement is usually the cleaner answer.
Which remediation method works for timber damage?
The right remediation method is the one that stops the cause and leaves the wood dry, stable, and strong enough for its job. For many jobs, that means a sequence: dry, clean, treat, repair, then protect.
Moisture remediation
Moisture remediation starts with fixing the leak, condensation point, or ground contact that made the wood wet. Without that step, no preservative or patch will hold. Drying then follows, often with air movement, dehumidification, or removal of adjacent wet materials.
This works for timber damaged by plumbing leaks, roof leaks, poor flashing, or trapped humidity. It fails when the wood has already lost too much section. A dry piece of rotten wood is still rotten wood if the fibers have been eaten away.
Decay treatment and consolidation
Decay treatment uses wood preservatives or consolidants to stabilize wood that is softened but still present. This is common in repair work on historic timber, trim, and exposed framing where full replacement would remove too much original material.
The benefit is that it can preserve shape and reduce future deterioration, but a qualified professional should confirm that the product and the remaining wood are compatible. The cost is that it depends on good prep and the right product system. If loose fibers remain or moisture stays high, the treatment has little value. A consolidant is not a structural miracle; it is a support for wood that still has enough remaining body.
Splice, sister, and patch repairs
Splice and sister repairs rebuild the failed portion while keeping the sound timber in service. A splice replaces a damaged end or section. A sister adds a new member alongside the old one. A dutchman inserts a shaped repair into a local void.
These repairs are useful when the defect is localized and the rest of the timber is sound. They are poor choices when the hidden defect extends farther than the visible damage. They also need correct fastening and bearing; a pretty patch that does not transfer load is not a repair.
Replacement and rebuild
Replacement is the final remediation method when the timber cannot safely keep its role. If the wood is too far gone, no cleaner, filler, or preservative makes it sound again. Replacement is not a failure of judgment; it is the correct call when the material has crossed the repair line.
This is especially true for structural timbers with deep decay at supports, beam ends, or posts that carry load at critical points. If a section is spongy, hollow, or crushed, rebuilding around it is often false economy.
Extraction or remediation: which one wins in real life?
Extraction wins when the damaged wood has already lost structural value; remediation wins when the timber is still mostly sound and the cause can be controlled. The choice is about strength, not appearance.
| Criteria | Full extraction and replacement | Selective remediation and repair | Winner for this condition |
|---|---|---|---|
| Structural loss | Removes all unsound wood and resets the member | Keeps the sound portion and rebuilds the damaged area | Full extraction, when loss is deep |
| Historic material retention | Loses original fabric | Preserves more original wood | Selective remediation, for heritage work |
| Speed of outcome | Often faster once the decision is made | Can take longer because prep and drying matter | Full extraction, for extensive damage |
| Cost pressure | Can be higher because more material is replaced | Can be lower when damage is local | Selective remediation, for small defects |
| Risk of hidden failure | Low after replacement | Higher if decay depth was misread | Full extraction, for uncertain damage depth |
| Moisture control need | Still required, but the bad wood is gone | Essential before and after repair | Selective remediation, if moisture is fixed first |
| Aesthetic continuity | New wood may stand out | Existing timber stays in place | Selective remediation, for visible beams |
| Suitability for insect damage | Better if galleries run widely | Works only when attack is limited | Full extraction, for widespread infestation |
| Suitability for coatings/lead | Removes contaminated material entirely | Requires strict containment and cleanup | Full extraction, if contamination is broad |
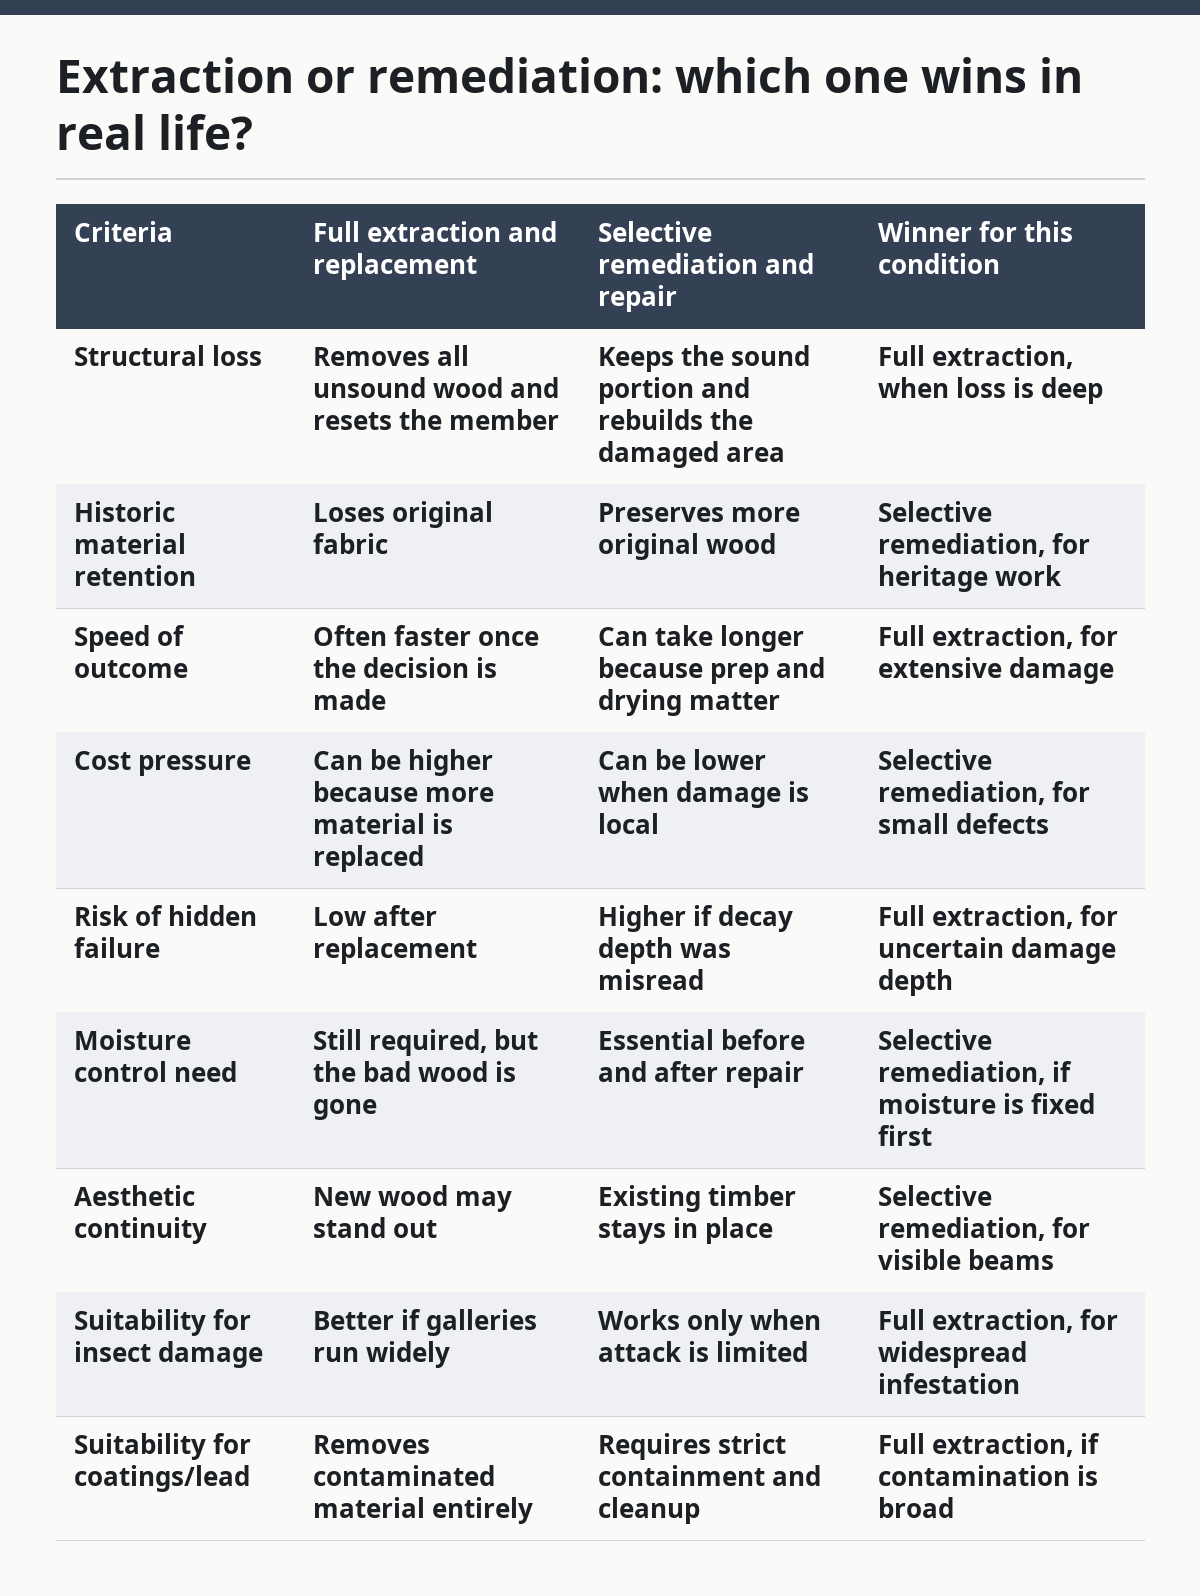
The table points to a plain rule: extraction wins when the wood’s job has ended, and remediation wins when the wood still has enough life left to justify saving. That is why the first job is inspection, not repair.
What does a good timber remediation sequence look like?
A good remediation sequence starts with finding the cause, then removing only what cannot be saved. The order matters. If the cause remains, every repair is temporary.
First, identify the damage source. Moisture, insects, fire, impact, coating failure, and contamination all create different repair paths. Second, isolate the area and remove unsafe or contaminated wood. Third, dry and stabilize the remaining timber. Fourth, repair with a method that matches the remaining section. Fifth, protect the repaired area with good detailing, drainage, ventilation, or coating.
This sequence matters because a timber repair is only as good as the condition behind it. A beam end that was cut back and patched but left against wet masonry will fail again. A joist that was sistered without fixing the leak will continue to decay. A finish that hides debris or soft fibers will not bond well.
The most useful check before any repair is simple enough to do on site: probe the wood. If the probe meets firm resistance and the damage is shallow, remediation is reasonable. If the probe sinks deep, the member feels hollow, or the damage spreads past the visible patch, extraction moves to the front of the line.
When should timber be replaced instead of repaired?
Timber should be replaced when the damaged portion is too large, too deep, or too critical to leave in service. If the wood cannot reliably carry load after repair, replacement is the safer choice.
That is especially true at supports, beam ends, post bases, sill plates, and other spots where a failure affects the whole structure. It also applies when the timber has repeated wetting, widespread insect galleries, or damage that extends beyond one obvious face. A repair that needs to be repeated every season is not a repair; it is a delay.
Replacement is also the cleanest answer when hazardous coatings or contamination cover a broad area. In that case, the risk and labor involved in piecemeal cleaning may exceed the value of saving the original member. The EPA’s lead-safe renovation requirements are the clearest example: if the coating issue is broad and regulated, containment and certified work matter as much as the timber itself.
What are the biggest mistakes people make?
The biggest mistake is treating every soft spot as if it needs the same fix. That leads to overcutting sound timber, undercutting decayed timber, or sealing moisture into the repair.
Another mistake is using surface cosmetics as proof of structural soundness. Fresh filler, new paint, and smooth sanding can hide a failure for a while, but they do not restore load path. A third mistake is skipping the cause. If water, insects, or contamination remains active, the repair is temporary by design.
A fourth mistake is mixing methods without a plan. Chemical stripping, aggressive sanding, and resin consolidation can interfere with one another if used in the wrong order. The products may adhere poorly or trap residue. That is why timber remediation should be sequenced, not improvised.
What should a beginner do first?
A beginner should start by separating visible damage from structural damage. That means probing the wood, checking the moisture source, and deciding whether the problem is surface-only or deep enough to change the member’s job.
If the damage is shallow, remediation may be enough. If the timber feels soft through depth, has large voids, or sits in a critical load point, extraction and replacement are safer. When the problem involves lead paint, extensive decay, or a structural member, a qualified contractor or preservation specialist should be consulted before work starts.
For wood-damage basics and treatment principles, the USDA Forest Products Laboratory is a solid technical source. For renovation work on coated surfaces that may contain lead, the EPA rule at 40 CFR Part 745 is the key legal reference. For broader guidance on hazard control, see the EPA’s lead renovation page: https://www.epa.gov/lead/renovation-repair-and-painting-program
What is the bottom line?
Choose full extraction if the timber has deep structural loss, widespread insect damage, or contamination that makes repair unsafe. Choose selective remediation if the wood is still mostly sound, the damage is localized, and the cause can be fixed first. Neither is right if the timber is still wet, the decay source is active, or the load path is already too compromised to trust.
FAQ
How do I know if timber needs extraction or just repair?
If the damage is shallow and the surrounding wood is firm, repair is usually enough. If a probe sinks deeply, the timber crumbles, or the damage reaches a support point, extraction becomes the safer choice. The decision should follow the wood’s structural condition, not just how it looks.
Can you save timber with rot in it?
Yes, but only when the rot is local and the remaining wood still has enough strength to matter. The moisture source must be fixed first, or the rot will return. If the decay is deep, spread out, or at a load-bearing end, replacement is usually the better call.
Is sanding enough to remediate damaged timber?
No, sanding only removes the surface layer. It helps with finish work, light weathering, and some coating removal, but it does not fix deep decay or internal insect damage. If the problem goes beyond the surface, sanding can make the wood look better while leaving the failure in place.
What if the timber has lead paint on it?
Follow EPA Renovation, Repair and Painting requirements in 40 CFR Part 745 if lead paint may be present. That means containment, cleanup, and the right level of certified work where required. A coating problem changes the job because dust control and safe removal matter as much as the wood itself.
When is replacement better than remediation?
Replacement is better when the timber has lost too much section, the damage is at a critical support, or the problem keeps coming back because the cause was not fully controlled. It is also the cleaner answer when contamination, rot, or insect damage is widespread. A repair that cannot restore dependable strength should not be forced to do the job.
Drafted with AI; not yet reviewed by a person.